Instructions to Draw Rick and Morty – A Complete Guide

Introduction:
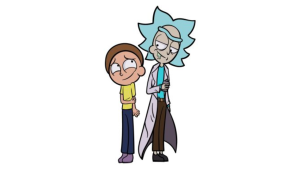
Draw Rick and Morty: Made by Justin Roiland and Dan Harmon, “Rick and Morty” has become a religion’s most loved vivified series known for its special mix of sci-fi, humor, and frequently ludicrous circumstances. The show’s unmistakable visual style contributes fundamentally to its allure, immediately making characters like Rick Sanchez and Morty Smith conspicuous. If you love the show and need to take a shot at drawing its notable characters, you’re perfectly positioned. In this bit-by-bit guide, we’ll take you through the most common way of drawing Rick and Morty.
Also, you may like these simple Turkey coloring pages.
Materials You’ll Need:
Before you begin drawing, ensure you have the accompanying materials available:
- Pencil: A normal pencil (HB or 2B) for drawing and illustrating.
- Eraser: A decent eraser to address botches and refine your lines.
- Paper: Utilize a perfect piece of paper or a sketchbook.
- Markers or Hued Pencils: If you need to add tone to your drawing, prepare a few markers or shaded pencils.
Stage 1: Essential Shapes
Begin by drawing fundamental shapes to frame the characters’ extents. For Rick, draw an oval for his head and a bigger oval for his body. Morty’s head is additionally oval, yet marginally more modest, and his body is more rectangular. These shapes will act as the establishment until the end of the drawing.
Stage 2: Facial Highlights
Drawing Rick:
Eyes: Put two circles on Rick’s head for his eyes. He ordinarily has a to some degree frenzied articulation, so make the eyes lopsided and calculated this way and that.
Eyebrows: Draw thick, shaggy eyebrows over his eyes, calculating them upwards to convey his trademark suspicious or irritated look.
Nose: Rick’s nose is a basic round shape that rests between his eyes. It needn’t bother with to be excessively nitty gritty.
Mouth: Add a wide, bent line underneath the nose to make his mouth. You can give him a naughty smile or a skeptical sneer.
Kinks and Lines: Rick’s face is loaded up with kinks and lines, demonstrating his age a, nd to some degree, ee rumpled appearance. Add free, bent lines around his eyes, temple, and mouth.
Drawing Morty:
Eyes: Draw two circles for Morty’s eyes. Keep them bigger and closer together than Rick’s eyes.
Eyebrows: Unlike Rick, Morty has more slender eyebrows that are normally raised, mirroring his anxiety.
Nose: Like Rick’s, Morty’s nose is a straightforward round shape between his eyes.
Mouth: Make a little, marginally open mouth for Morty. This will add to his brand name stressed articulation.
Stage 3: Body and Attire
Draname-stressederile jacket: Rick commonly wears a white sterile jacket. Sketch the blueprint of the coat, ensuring it’s more limited than his body and doesn’t cover his whole legs.
Shirt and Jeans: Under the sterile jacket, draw the layout of a blue shirt and dim jeans. Keep the shapes straightforward and free.
Collar and Tie: Add a little collar at the highest point of the sterile jacket and a free nearby Rick’s neck.
Drawing Morty:
Shirt and Jeans: Morty wears a yellow shirt and blue jeans. Sketch the state of his dress, keeping the lines loose and not excessively definite.
Shoes: Draw his basic tennis shoes at the lower part of his legs.
Stage 4: Hair and Adornments
Drawing Rick:
Hair: Rick’s hair is untidy and wiry. Utilize short, rough lines to make his hair, ensuring it stands out this way and that.
Eyebrows and Facial Subtleties: Add more lines to characterize his shaggy eyebrows and kinks on his brow.
Extras: Rick frequently has a slobber stain on his sterile garment, and you can add a carafe or other logical device to his sterile garment pocket.
Drawing Morty:
Hair: Morty’s hair is a basic, somewhat muddled style. Utilize bent lines to portray his hair without an excess of detail.
Ears: Draw his ears as basic bent shapes on one side of his head.
Articulation Lines: Utilize light lines to underscore Morty’s stressed articulation. Add a sprinkle of disquiet to his elements.
Stage 5: Tweaking and Framing
After you’ve outlined the two characters’ e fundamental shapes, facial highlights, bodies, and addresses, now is the right time to refine your drawing. Utilize a hazier pencil or pen to frame the characters, making their shapes more characterized and adding any little subtleties you might have missed.
Stage 6: Adding Variety
If you want to add tone to your drawing, this present time’s the opportunity to make it happen. Use markers or shaded pencils to rejuvenate Rick and Morty. Recollect the shades of their attire and hair, and go ahead and get imaginative with concealing to add profundity to your drawing.
Stage 7: Last Contacts
Stride back and assess your drawing whenever you’ve added variety and extra subtleties. Make any essential changes or redresses to guarantee your characters look how you need them to.
Your Rick and Morty Drawing is Finished!
These characters are known for the odd experiences they set out upon, and we trust that you partook in the attracting experience this aide on the best way to draw Rick and Morty! Drawing characters like this can be not easy regardless of whether you’re exceptionally acquainted with them, so we trust that this guide made it fun and simple for you to do. There’s a great deal of space for you to flaunt your creative mind as you finish this picture.
The show is likewise known for the eccentric, brilliant settings the tales happen in, and you could have a great time making a tomfoolery foundation for them. What sort of setting could you place these two travelers in? When prepared to take on another drawing challenge, you can then dare to our site.
End:
Drawing characters like Rick and Morty can beclowningery and remunerating experience, particularly for enthusiasts how. Recall that careful discipline brings promising results, and cheer up if your most memorable endeavor doesn’t end up being definite as you envisioned. As you draw and try different things with various strategies, you’ll probably see improvement over the long run. So snatch your materials, channel your inward craftsman, and partake during the time spent rejuvenating these dearest characters on paper!
For more information, please Visit Here!